Difference between revisions of "Demo"
m (playback info) |
m (fix spelling) |
||
| (16 intermediate revisions by 6 users not shown) | |||
| Line 17: | Line 17: | ||
Demos can be played back in game for viewing, or for external recording with <code>playdemo demoname</code> where ''demoname'' is the name of the demo file you recorded to. Use <code>stopdemo</code> to stop demo playback. <code>startdemos</code> plays a sequence of demos (for example: '''demo''', '''demo_1''', '''demo_2''', etc). | Demos can be played back in game for viewing, or for external recording with <code>playdemo demoname</code> where ''demoname'' is the name of the demo file you recorded to. Use <code>stopdemo</code> to stop demo playback. <code>startdemos</code> plays a sequence of demos (for example: '''demo''', '''demo_1''', '''demo_2''', etc). | ||
| − | [[SAR]] has | + | [[SAR]] has an improved version of the <code>startdemos</code> commands for demo viewing. |
*<code>sar_startdemos</code> | *<code>sar_startdemos</code> | ||
| Line 23: | Line 23: | ||
*<code>sar_stopdemos</code> - Stops the demo queue. | *<code>sar_stopdemos</code> - Stops the demo queue. | ||
| − | You can use the command <code>demoui</code> for more options while watching demos, or you can use <code> | + | You can use the command <code>demoui</code> for more options while watching demos, or you can use <code>shift + F2</code>. |
==Stopping Demo Recording For Single Player Challenge Mode== | ==Stopping Demo Recording For Single Player Challenge Mode== | ||
| Line 44: | Line 44: | ||
==Challenge Mode== | ==Challenge Mode== | ||
| − | {{P2_Video|url=https://www.youtube.com/watch?v=iffKzl0izX4 | + | {{P2_Video|url=https://www.youtube.com/watch?v=iffKzl0izX4|desc=Challenge Mode Demo Tutorial}} |
===SAR Demo Recording Tools=== | ===SAR Demo Recording Tools=== | ||
| − | [[SAR]] has many useful features for demo recording | + | [[SAR]] has many useful features for demo recording, particularly during full game runs. These features are mentioned on the [[SAR|SAR wiki page]]. Here are some of the useful commands mentioned there: |
| − | + | *<code>sar_record_prefix</code> - prepends a string to the start of demo names. Can use [https://man7.org/linux/man-pages/man3/strftime.3.html strftime] formatting to timestamp your demos. | |
| + | *<code>sar_record_at_demo_name <demoname></code> - Takes a value for the name of the demo the game will record. | ||
| + | *<code>sar_record_at</code> - default -1 - Any value higher than -1 is the number of ticks in game that will go by before a recording starts. For example, to start on the second in-game tick: <code>sar_record_at 2</code>. Only <code>sar_record_at 0</code> is allowed. | ||
| + | *<code>sar_record_at_increment</code> - default 0 - Adds a number after your demoname (Example: <code>demoname_2</code> if set to <code>1</code>). This acts as version control, to avoid overriding demos you might have wanted to revisit, but does stack up new demos until the game is restarted, so if you use this feature, it's a good idea to periodically delete demos. | ||
| − | *<code> | + | <pre style="color: red">Note: sar_record_at does not work for the orange bot in coop.</pre> |
| − | *<code> | + | |
| − | *<code> | + | <pre style="color: red">Note: If you pause the game with the esc key on the frame that the demo is set to record, the recording will not be processed. Performing a console pause (pausing by opening the console with ~) will not interrupt the recording.</pre> |
| + | |||
| + | =Demo Rendering= | ||
| + | |||
| + | [[gaming]]'s guide on [https://docs.google.com/document/d/1uw6lmhNcLphS81lu-6MXdQV_pVd34IA4jE2KoY9w00E/edit demo rendering] | ||
| + | |||
| + | ==Demo Rendering with [[SAR]]== | ||
| + | ===Cvars=== | ||
| + | Rendering with SAR is simple, but there are a few things you can change about it to make it suit your needs best: | ||
| + | * <code>sar_render_quality</code>: Self-explanetory name, ranges from 1-50, with 1 being the lowest and 50 being essentially lossless. A recommended value is around 40-50. | ||
| + | * <code>sar_render_blend</code>: How many frames are blended per frame. The higher this value is, the more blended together each frame will look. Ranges from 1-Infinite, and if set to 0 will attempt to find a good blend rate based on <code>host_framerate</code>. Recommended values are: 1-32. | ||
| + | * <code>sar_render_acodec</code>: If you aren't getting any audio when playing back a rendered video, change this to a different codec, such as aac. Allowed values are: aac, ac3, vorbis, opus, and flac. | ||
| + | ===Binds=== | ||
| + | * Start Render bind: <code>sar_render_start <renderpath>; demo_resume</code> (replace <renderpath> with the filename of your video, the path is relative to <code>steamapps\common\Portal 2</code>. For example, setting <renderpath> to <code>folder/file.mp4</code> would result in the video being rendered to <code>steamapps\common\Portal 2\folder\file.mp4</code>. If you render it to a subfolder, it MUST already exist) | ||
| + | ===Rendering=== | ||
| + | Set <code>sar_render_remove_broken</code> to 0. Play your demo, go to tick 0 and pause. Then you need to get on tick 1 by inputting these commands: | ||
| + | * <code>sv_alternateticks 0</code> | ||
| + | * <code>demo_pauseonservertick 1</code> | ||
| + | * <code>demo_resume</code> | ||
| + | * <code>sv_alternateticks 1</code> | ||
| + | <pre style="color: red">Note: If you want to bind these commands to a key, don't bind setting sv_alternateticks back to 1, because it all runs on the same tick and it will skip 2 ticks instead of 1</pre> | ||
| + | If you did this part correctly, when you open demoui (open by pressing <code>Shift+F2</code> or by typing <code>demoui</code> in console), it should show that you are on tick 1. Now press your start render bind and wait until it finishes. Once it finishes, the rendered video will be in your <code>steamapps\common\Portal 2</code> directory. | ||
| + | ==Frameblending== | ||
| + | ===Software needed for frameblending=== | ||
| + | * [https://github.com/jonese1234/srcdemo2/releases SrcDemo²] | ||
| + | * [https://github.com/dokan-dev/dokany/releases/tag/v0.7.4 Dokan 0.7.4] (needed library for SrcDemo²) | ||
| + | * [https://www.microsoft.com/en-us/download/details.aspx?id=40784 VCRedist 2013] (also a needed library for SrcDemo²) | ||
| + | * (Optional) [https://download.oracle.com/otn-pub/java/jdk/15.0.2%2https://www.google.com/intl/en/policies/terms/B7/0d1cfde4252546c6931946de8db48ee2/jdk-15.0.2_windows-x64_bin.exe Java Server JVM] for better performance | ||
| − | <pre style="color: red"> | + | ==Setup== |
| + | ====Folders==== | ||
| + | * Make 2 folders in the Portal 2 folder, one for the raw frames and one for the blended frames and then set the paths for them in SrcDemo². | ||
| + | ====Binds==== | ||
| + | * Start Render bind: <code>startmovie <renderpath>; demo_resume</code> (replace <renderpath> with the path to the raw frames folder you made) | ||
| + | <pre style="color: red">Important: In the render bind you need to name the images aswell.</pre> | ||
| + | * Optional "tick 1" bind: <code>sv_alternateticks 0; demo_pauseatservertick 1; demo_resume</code> (remember to set sv_alternateticks back to 1!!!) | ||
| + | |||
| + | ===Settings=== | ||
| + | [[File:srcdemo.png|thumb|Good settings for SrcDemo²]] | ||
| + | {{P2_Video|url=https://www.youtube.com/watch?v=puDGz2VLQUQ|desc=This is what the settings from above should look like. Video by [[Swagatron]], rendered by [[gaming]]}} | ||
| + | {{P2_Video|url=https://www.youtube.com/watch?v=j8stwgzHZbo|desc=This shows the difference between a normal demo rendering and a demo rendering with SrcDemo². Video by [[Babyfurz]]}} | ||
| + | ====Video output==== | ||
| + | * <code>PNG</code> is a lossless, compressed image format. Good for losslessness while keeping disk usage minimal. | ||
| + | * <code>TGA</code> is a lossless, compressed image format. Good if the disk is very fast but the CPU isn't. | ||
| + | * <code>JPEG</code> is a lossy, compressed image format. Good if running low on disk space. | ||
| + | <pre style="color: red">Recommended: PNG.</pre> | ||
| + | ====Final video FPS==== | ||
| + | The amount of frames per second you want your video to have. | ||
| + | <pre style="color: red">Recommended: 60 frames per second.</pre> | ||
| + | ====Motion blur blend rate==== | ||
| + | The amount of frames you want to be blended into one frame. | ||
| + | <pre style="color: red">Recommended: 32 frames per frame for 360 simulated shutter angle. | ||
| + | 16 or 3 frames per frame for 180 simulated shutter angle.</pre> | ||
| + | |||
| + | ====Simulated shutter angle==== | ||
| + | The simulated shutter angle of each frame. Now you may ask, what is shutter angle? Well, here's a striking example of how important getting the right shutter angle is. This is the same scene, recorded at multiple shutter angles. | ||
| + | |||
| + | [[File:windflowershutterangle.png|384px]] | ||
| + | |||
| + | |||
| + | This is a camera with a 180° shutter angle: | ||
| − | + | [[File:shutterangleanimation.gif]] | |
| − | + | As you can see, each physical frame of the film is exposed to photons 50% of the time. For a 30 frames per second video, a new physical frame is made every 1/30th of a second. However, since it is only exposed 50% of the time, only 1/60th of a second's worth of exposure has gone onto the frame. The other 1/60th of a second is simply gone, not recorded. As you can imagine, a higher shutter angle means a longer exposure time. For example, a 270° shutter angle, the frame would get 3/120th of a second's worth of exposure, and 1/120th of a second would be gone. With a 360° shutter angle, the frame will get the full 1/30th worth of exposure, and nothing will be lost. | |
| + | <pre style="color: red">Recommended: 360° shutter angle for higher amount of blended frames. | ||
| + | 180° shutter angle for lower amount of blended frames.</pre> | ||
| + | ====Use gaussian blending==== | ||
| + | Use gaussian blending method instead of linear blending method. Examples down below. The image on the left is an example of <code>Linear blending</code> and the image on the right is an example of <code>Gaussian blending</code>. | ||
| − | <pre style="color: red"> | + | [[File:regular-blend-reference.png|300px]] [[File:gaussian-blend-reference.png|300px]] |
| + | <pre style="color: red">Recommended: Have it disabled, use Linear Blending.</pre> | ||
| − | |||
| − | = | + | ===Frameblending the demo=== |
| + | Set <code>host_framerate</code> to whatever number SrcDemo² displays and press "Activate". Play your demo, go to tick 0 and pause. Then you need to get on tick 1 by inputting these commands: | ||
| + | * <code>sv_alternateticks 0</code> | ||
| + | * <code>demo_pauseonservertick 1</code> | ||
| + | * <code>demo_resume</code> | ||
| + | * <code>sv_alternateticks 1</code> | ||
| + | <pre style="color:red">Note: If you want to bind these commands to a key, dont bind setting sv_alternateticks back to 1, because it all runs on the same tick and it will skip 2 ticks instead of 1"</pre> | ||
| + | If you did this part correctly, when you open demoui (open by pressing <code>Shift+F2</code> or by typing <code>demoui</code> in console), it should show that you are on tick 1. Now press your start render bind and wait until it finishes. Once it finishes type <code>endmovie</code> in console. Now just put all the frames together in some editing program. | ||
| − | |||
[[Category:Game Function]] | [[Category:Game Function]] | ||
Latest revision as of 03:30, 15 October 2022
Contents
Overview
Demo files are used in Portal 2 as a form of proof for runs, and a way to carefully analyze a segment of the game.
For More information on the .dem file format visit the Valve Developer Wiki
How to Record a Demo
In the developer console, type record demoname, where demoname is the name of your desired demo file.
The demo files are stored by default in your portal2 folder (SteamLibrary\steamapps\common\Portal 2\portal2)
Demo Playback
Demos can be played back in game for viewing, or for external recording with playdemo demoname where demoname is the name of the demo file you recorded to. Use stopdemo to stop demo playback. startdemos plays a sequence of demos (for example: demo, demo_1, demo_2, etc).
SAR has an improved version of the startdemos commands for demo viewing.
sar_startdemos
sar_stopdemos- Stops the demo queue.
You can use the command demoui for more options while watching demos, or you can use shift + F2.
Stopping Demo Recording For Single Player Challenge Mode
If a demo recording is not stopped in Single Player Challange Mode, the timer will become inaccurate up to .4 seconds. Meaning when you carry over demo recordings, your times in single player cm could be .4 slower than they would have otherwise been. This does not impact coop Challenge Mode.
To stop demos, simply use the stop command. This can be bound to your restart level key. bind key "stop;restart_level". The reload command will also stop demo records, and restart your level in Single Player Challenge Mode, however it is worth noting that the command will load from a save point in full game, and not work at all for coop Challenge mode.
Saving Demos to a Subfolder
You can save demos to a subfolder by naming the file with a pre-existing folder name, followed by a backslash, and the demo name.
- NOTE: If the folder does not exist, Portal 2 will not create a folder for you and your demos will not be recorded.
(Ex: record foldername\demoname)
Easy Recording Methods
If you aren't using SAR to handle demo recording, the most common way to record demos easily in Challenge Mode is to bind it to your w key along with +forward. For example, bind w "+forward;record demo"
Challenge Mode
Challenge Mode Demo Tutorial
SAR Demo Recording Tools
SAR has many useful features for demo recording, particularly during full game runs. These features are mentioned on the SAR wiki page. Here are some of the useful commands mentioned there:
sar_record_prefix- prepends a string to the start of demo names. Can use strftime formatting to timestamp your demos.sar_record_at_demo_name <demoname>- Takes a value for the name of the demo the game will record.sar_record_at- default -1 - Any value higher than -1 is the number of ticks in game that will go by before a recording starts. For example, to start on the second in-game tick:sar_record_at 2. Onlysar_record_at 0is allowed.sar_record_at_increment- default 0 - Adds a number after your demoname (Example:demoname_2if set to1). This acts as version control, to avoid overriding demos you might have wanted to revisit, but does stack up new demos until the game is restarted, so if you use this feature, it's a good idea to periodically delete demos.
Note: sar_record_at does not work for the orange bot in coop.
Note: If you pause the game with the esc key on the frame that the demo is set to record, the recording will not be processed. Performing a console pause (pausing by opening the console with ~) will not interrupt the recording.
Demo Rendering
gaming's guide on demo rendering
Demo Rendering with SAR
Cvars
Rendering with SAR is simple, but there are a few things you can change about it to make it suit your needs best:
sar_render_quality: Self-explanetory name, ranges from 1-50, with 1 being the lowest and 50 being essentially lossless. A recommended value is around 40-50.sar_render_blend: How many frames are blended per frame. The higher this value is, the more blended together each frame will look. Ranges from 1-Infinite, and if set to 0 will attempt to find a good blend rate based onhost_framerate. Recommended values are: 1-32.sar_render_acodec: If you aren't getting any audio when playing back a rendered video, change this to a different codec, such as aac. Allowed values are: aac, ac3, vorbis, opus, and flac.
Binds
- Start Render bind:
sar_render_start <renderpath>; demo_resume(replace <renderpath> with the filename of your video, the path is relative tosteamapps\common\Portal 2. For example, setting <renderpath> tofolder/file.mp4would result in the video being rendered tosteamapps\common\Portal 2\folder\file.mp4. If you render it to a subfolder, it MUST already exist)
Rendering
Set sar_render_remove_broken to 0. Play your demo, go to tick 0 and pause. Then you need to get on tick 1 by inputting these commands:
sv_alternateticks 0demo_pauseonservertick 1demo_resumesv_alternateticks 1
Note: If you want to bind these commands to a key, don't bind setting sv_alternateticks back to 1, because it all runs on the same tick and it will skip 2 ticks instead of 1
If you did this part correctly, when you open demoui (open by pressing Shift+F2 or by typing demoui in console), it should show that you are on tick 1. Now press your start render bind and wait until it finishes. Once it finishes, the rendered video will be in your steamapps\common\Portal 2 directory.
Frameblending
Software needed for frameblending
- SrcDemo²
- Dokan 0.7.4 (needed library for SrcDemo²)
- VCRedist 2013 (also a needed library for SrcDemo²)
- (Optional) Java Server JVM for better performance
Setup
Folders
- Make 2 folders in the Portal 2 folder, one for the raw frames and one for the blended frames and then set the paths for them in SrcDemo².
Binds
- Start Render bind:
startmovie <renderpath>; demo_resume(replace <renderpath> with the path to the raw frames folder you made)
Important: In the render bind you need to name the images aswell.
- Optional "tick 1" bind:
sv_alternateticks 0; demo_pauseatservertick 1; demo_resume(remember to set sv_alternateticks back to 1!!!)
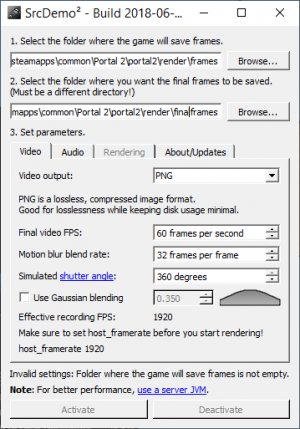
Settings
This shows the difference between a normal demo rendering and a demo rendering with SrcDemo². Video by Babyfurz
Video output
PNGis a lossless, compressed image format. Good for losslessness while keeping disk usage minimal.TGAis a lossless, compressed image format. Good if the disk is very fast but the CPU isn't.JPEGis a lossy, compressed image format. Good if running low on disk space.
Recommended: PNG.
Final video FPS
The amount of frames per second you want your video to have.
Recommended: 60 frames per second.
Motion blur blend rate
The amount of frames you want to be blended into one frame.
Recommended: 32 frames per frame for 360 simulated shutter angle.
             16 or 3 frames per frame for 180 simulated shutter angle.
Simulated shutter angle
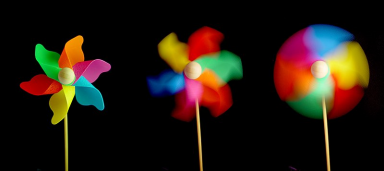
The simulated shutter angle of each frame. Now you may ask, what is shutter angle? Well, here's a striking example of how important getting the right shutter angle is. This is the same scene, recorded at multiple shutter angles.
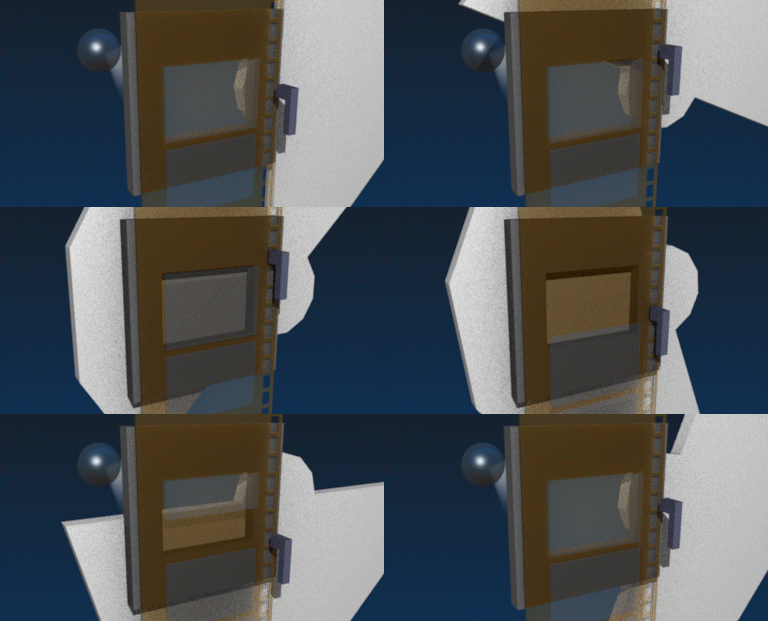
This is a camera with a 180° shutter angle:
As you can see, each physical frame of the film is exposed to photons 50% of the time. For a 30 frames per second video, a new physical frame is made every 1/30th of a second. However, since it is only exposed 50% of the time, only 1/60th of a second's worth of exposure has gone onto the frame. The other 1/60th of a second is simply gone, not recorded. As you can imagine, a higher shutter angle means a longer exposure time. For example, a 270° shutter angle, the frame would get 3/120th of a second's worth of exposure, and 1/120th of a second would be gone. With a 360° shutter angle, the frame will get the full 1/30th worth of exposure, and nothing will be lost.
Recommended: 360° shutter angle for higher amount of blended frames.
             180° shutter angle for lower amount of blended frames.
Use gaussian blending
Use gaussian blending method instead of linear blending method. Examples down below. The image on the left is an example of Linear blending and the image on the right is an example of Gaussian blending.
Recommended: Have it disabled, use Linear Blending.
Frameblending the demo
Set host_framerate to whatever number SrcDemo² displays and press "Activate". Play your demo, go to tick 0 and pause. Then you need to get on tick 1 by inputting these commands:
sv_alternateticks 0demo_pauseonservertick 1demo_resumesv_alternateticks 1
Note: If you want to bind these commands to a key, dont bind setting sv_alternateticks back to 1, because it all runs on the same tick and it will skip 2 ticks instead of 1"
If you did this part correctly, when you open demoui (open by pressing Shift+F2 or by typing demoui in console), it should show that you are on tick 1. Now press your start render bind and wait until it finishes. Once it finishes type endmovie in console. Now just put all the frames together in some editing program.

