Future Starter
- Previous Map Cube Momentum
- File Name sp_a1_intro6
- Appearance Courtesy Call
- Native to Challenge Mode Yes
- World Record loading...
- Least Portals loading...
- Next Map Secret Panel
Overview
Future Starter is a fairly straight-forward map, that uses mostly tricks from previous chambers in the game, with one notable difference being the Button Stick Glitch used to skip the second half of the chamber.
General Route
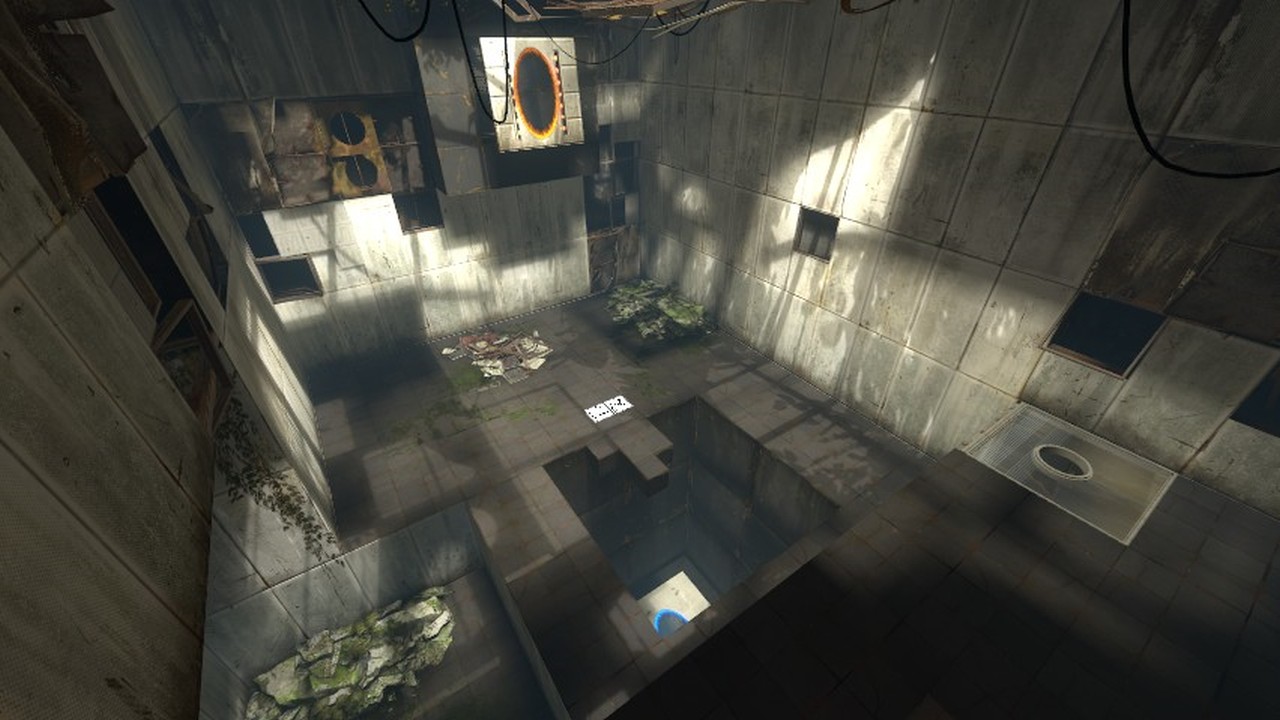
First Room
 Location of the trigger that opens the Orange Portal
All routes start the same on Future Starter. After you circle jump out of the elevator, you want to make sure to set yourself up to hop under the door frame, to pick up speed quickly, and hit the trigger for the orange portal quickly. This can be done by controlling your speed while strafing up the stairs, and jumping near the top of the stairs with the right amount of speed to land you under the door, or it can be done by getting close to the door quickly, and circle jumping under the door, being sure to hit your head on the door, and continue your hops.
Different runners place their blue portals in different places, the placement doesn't matter. The trigger can be seen to the side of this page, and so long as you pass through that trigger quickly, place the blue portal where ever is most comfortable to you. (It is worth noting that if your hops are slower, you might want to stick to the right wall)
Portal Stand / Peek-a-portal
The route after you walk into your blue portal, and stand outside the orange (being sure to be far-enough out to not peek-a-portal) is the exact same as the route in Cube Momentum. Portal Stand by re-shooting your blue portal in the small panel over the cube, and pushing back into the orange portal at the same time. After you're on the other-side of your new blue portal, you should be on-top of the cube's little shelter.
After this, you want to take advantage of the second, and last Single Portal Cube Grab in the main game by shooting under the cube, and quickly re-shooting in-front of you. More information on this glitch can be found on the article, and some additional information is also available on the Cube Momentum page if you're struggling to grasp the concept.
After you have the cube, get it to the button. In challenge mode, runners toss the cube to save time. But if you're doing a full-game run it's advised you place the cube on the button. After this is a series of hops from the door, through the hallway, and out to the second room. Different runners have different hop patterns here, and there is not a right way to hop here. Watch some videos on the Challenge Mode Leaderboards to see how other runners space their hops, and then test it out for yourself to see what works for you. World Record does a total of 7 hops from the circle jump under the door, to jumping the gap to the button in the second room, but there are wildly different patterns in the top 5 runs alone.
Common Routing Misconceptions
- If you end up back at the start with no portal in front of you, were most likely not far enough through the portal, or were moving backwards before shooting. This does not open up any routing opportunities.
- It's also worth noting getting to the ceiling in the first room is possible, but does not open up any routing opportunities.
Second Room
After hopping under the second door after placing the cube, your goal is to space hops out so that you make it over the gap to your right. In the best case scenario, you space your hops well, control your direction well and get over with no problems. A slightly worse case is needing to adjust, or reset your hops. But if it's between this and the final option, which is missing it and needing to place a portal and fling across, definitely take this option. But once you're across, you need to perform a Button Stick Glitch on the button to your right. This glitch sticks the door, and the platform giving you easy access to it stuck open, without a cube to hold it down.
There are a wide variety of setups for the button stick. The fastest, but least consistent will be in the Challenge Mode section, and the safer, more reliable setups in the Full Game section. Once you have the button stuck, you want to hop over to the pit, placing the blue portal on the top wall while falling, and fling yourself over to the door.
Challenge Mode Specific
World Record run by sSolle
The major optimizations for Challenge Mode runs are good hops, and a fast button press. However, a few smaller things are listed here to help people learn the map.
Cube Grab
There is a faster Single Portal Cube Grab strategy, which is used in Challenge Mode. You re-shoot your blue portal quicker, and are then able to grab the cube earlier, and a lot closer (even on the blue-side of the portal if done well) to you. It may take a while to get the timing down, but this optimization can help you improve your time and rise on the leaderboard.
Cube Toss
After you have the cube, it's faster to toss the cube onto the button. This is never 100% consistent, because the cube is a physics object, and has a mind of its own. But a good toss onto the button will save you time, and allows you to set up a hop pattern under the door.
Hop Spacing
You obviously want to get the hop spacing down for the area between the two rooms, or your chances of throwing a good run increase drastically. Carrying good hops into the second room, and controlling your hops correctly saves you a lot of time getting over to the button.
Fast Button Stick
The button stick is something that is much less consistent in Challenge Mode Runs. It is by far the biggest reset point on the map.
The best way to visualize it is that you want to jump into the corner of the button so that you just barely land on it. You want to hop near the bottom right corner of the button, and as you're falling, strafe to the right just far enough so that you barely touch the button. This take a good amount of time to get down properly. It's highly recommended that you practice this before attempting runs.
Ending Fling
 General area to shoot the blue portal to fling into the door
Finally, it's typically faster to shoot your blue portal after you jump into the pit, while you're beginning to fall, but as long as you keep moving, shooting it earlier should be fine. The general placement you want to shoot for is shown to the right. This is not a super precise shot. You can correct a sub-par portal placement with strafes. Just be sure to figure out a good vertical height for the portal, as going too low or too high will mess up your ending.
Full Game Specific
Example in a Single Segment run by Can't Even
Consistent Cube Grab
On the page for the Single Portal Cube Grab, we detail the differences between the two methods. But the basic idea for consistency is that you want to avoid moving away from your portal before you're sure you have the cube. Standing near the portal, or even moving closer after shooting is recommended.
Backups For Hopping The Gap
Optimally, you want to be able to continue your hops from the hallway, into the second room, and control them to land you on the other side of the chamber, by the button. But this doesn't always happen. If you know your hops won't work out for you, it is recommended to quick save, then back up and circle jump to set up a good bhop across the gap. Practice this for a while if you are having trouble making the normal hops. It's also definitely possible to circle jump the gap, but if you're struggling with the hops, this isn't recommended. If you can't manage to hop across at all, you should place a portal in the bottom left corner of the wall behind you, and go through the orange portal in the pit.
Button Stick Setups
There are too many setups to go over for the button stick on this map. But in general, most runners use the light near the wall, opposite the button.
There are two common setups. Both involve you wedging yourself in the back-left of the button room. This will leave you facing the light, with your camera angled away from the entrance to the button room. It is important to note that you should press up against the glass before making it into the back-left corner, as the frame around the glass creates another part to the corner that none of these setups work for. One set-up has you look just left of the edge of the light, and one where you line-up with a small portion of the light near the very top. There are reference images for both on the right of this page.
Once you line-up, just hold your +forward key, and make sure to check that the stick works. It's a good idea to try these out, and see which one works for you.

Lineup slightly to the left of this portion of the light
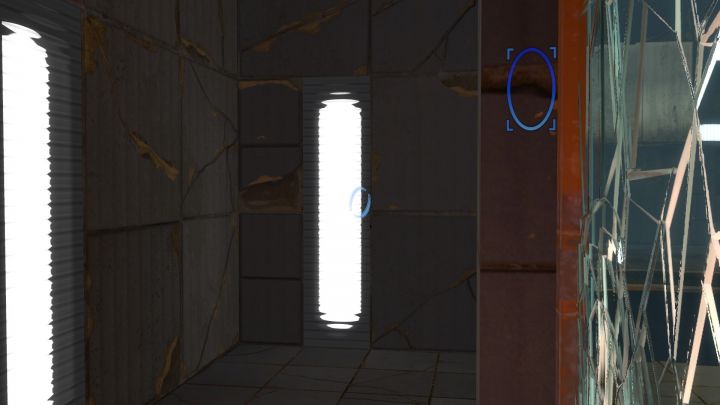
Lineup slightly to the left of the light

Lineup on the gray part of the button


If you have your own set-up, feel free to message any active contributors on the wiki, or make a free account and add information on your setup!
Ending Fling
Flinging to the door at the end is not as precise as in Challenge Mode Runs. When the door is open, there is a trigger outside the door that will activate as soon as you enter the box. The box itself surrounds the area outside of the door fairly broadly. This means that so long as you fling near the door, you will trigger the dialogue. If you take a look at the dialogue information, you will see that you have a good amount of time to make it to the elevator after activating this dialogue trigger.
Full Game Dialogue
The optimal dialogue for the Elevator Fade is entering the elevator after the announcer says "return"
"Good work getting this far, future-starter! That said, if you are simple-minded, old, or irradiated in such a way that the future should not start with you, please return [Enter Elevator] to your primitive tribe and send back someone better-qualified for testing."