Difference between revisions of "Incinerator"
Jesse (AMJ) (talk | contribs) m (the announcer isnt the speaker here!) |
(Adding Previous Map and Next Map to header infobox) |
||
| (6 intermediate revisions by 2 users not shown) | |||
| Line 1: | Line 1: | ||
{{P2_Infobox|Incinerator|Map_sp_a2_intro.jpg| | {{P2_Infobox|Incinerator|Map_sp_a2_intro.jpg| | ||
| − | *''File | + | *''Previous Map'' [[Wakeup]] |
| + | *''File Name'' sp_a2_intro | ||
*''Appearance'' [[Courtesy Call]] | *''Appearance'' [[Courtesy Call]] | ||
*''Native to Challenge Mode'' Yes | *''Native to Challenge Mode'' Yes | ||
*''World Record'' {{#p2sr:wr|sp:incinerator}} | *''World Record'' {{#p2sr:wr|sp:incinerator}} | ||
*''Least Portals'' {{#p2sr:lp|sp:incinerator}} | *''Least Portals'' {{#p2sr:lp|sp:incinerator}} | ||
| + | *''Next Map'' [[Laser Intro]] | ||
}} | }} | ||
| − | + | =Overview= | |
| − | '''Incinerator''' has you explore the pit you threw pieces of GLaDOS | + | '''Incinerator''' has you explore the pit you threw pieces of GLaDOS into during the first game, as well as being the chamber where you get the Dual Portal Gun, and are no longer limited to one portal. |
| − | + | =General Route= | |
| − | == | + | {{P2_Video|url=https://www.youtube.com/watch?v=EvSj4LJUgPM|time=541|desc=Example in a Full Game run by [[Can't Even]]}} |
| − | + | Unfortunately, the unskippable 20 second cutscene at the start of the level is present in both Full Game and Challenge Mode. This means that this is a great map to create a save for. Creating a custom save for this map at the end of the cutscene makes practicing this map much easier than just restarting the level any time you need to start over. | |
| − | Unfortunately, the unskippable 20 second cutscene at the start of the level is present in both | + | ==Starting Route Variations== |
| − | + | After the cutscene, you want to go about skipping some of this first room. There are two main methods for accomplishing this. The faster of the two is much more difficult, and only saves about a second, and that method will be done over in the [[#Challenge Mode Specific|Challenge Mode Specific]] section. Even for challenge mode, you can very easily get a top time without the use of the harder route, so we will go over the more standard route here. | |
| − | |||
| − | |||
| − | After the | ||
Once you gain control of your character, you want to walk to your right, towards the pipes that will move out of your way. Tapping your strafe keys while walking (AD Spamming) is the fastest way to hit the trigger activating the movement of the pipes, if you jump during the start of the map, you will jump over the pipes, and they will not rise as quickly. After the pipes move our of your way, look to your left. There is a large pipe sticking out, and with a Circle Jump, you can hop off it, towards the end of the incinerator room. | Once you gain control of your character, you want to walk to your right, towards the pipes that will move out of your way. Tapping your strafe keys while walking (AD Spamming) is the fastest way to hit the trigger activating the movement of the pipes, if you jump during the start of the map, you will jump over the pipes, and they will not rise as quickly. After the pipes move our of your way, look to your left. There is a large pipe sticking out, and with a Circle Jump, you can hop off it, towards the end of the incinerator room. | ||
| − | + | <gallery> | |
| − | <gallery | ||
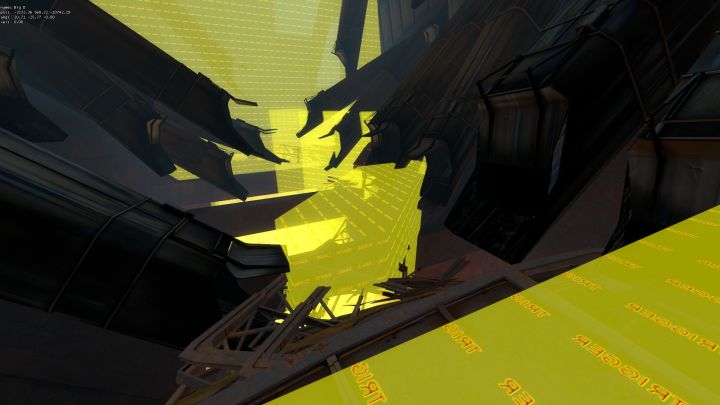
File:IncineratorFirstTrigger.jpg|thumb|First trigger that moves the pipes out of your way for the general route | File:IncineratorFirstTrigger.jpg|thumb|First trigger that moves the pipes out of your way for the general route | ||
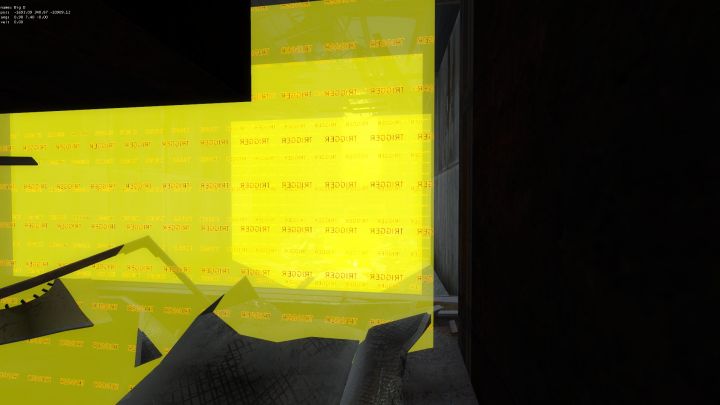
File:IncineratorPortalGunTrigger.jpg|thumb|Trigger that starts the dialogue, and prevents you from picking up the Portal Gun quickly | File:IncineratorPortalGunTrigger.jpg|thumb|Trigger that starts the dialogue, and prevents you from picking up the Portal Gun quickly | ||
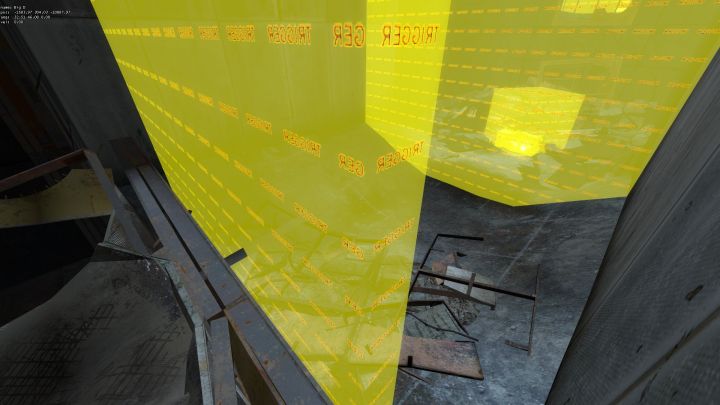
| − | File:IncineratorPortalGunTrigger2.jpg|thumb|The second half of the portal gun trigger, to show how much space you have to avoid the trigger | + | File:IncineratorPortalGunTrigger2.jpg|thumb|The second half of the portal gun trigger, to show how much space you have to avoid the trigger |
| − | File:IncineratorEndingTrigger.jpg|thumb|The ending trigger where you must pass through, and look at the panels if you want to activate the dialogue for full game runs | + | File:IncineratorEndingTrigger.jpg|thumb|The ending trigger where you must pass through, and look at the panels if you want to activate the dialogue for full game runs |
</gallery> | </gallery> | ||
| − | + | ==Portal Gun Trigger Skip== | |
| − | |||
| − | |||
At the entrance to the hallway containing the Portal Gun, there is a trigger that plays dialogue for you finding the Portal Gun. This prevents you from being able to pick up the Portal Gun until the dialogue is finished. This trigger loses a large amount of time, and due to a gap on the side of the trigger, careful movement can avoid the back-half of this trigger, and save a large amount of time, even if done slowly. In the gallery above are two images that show the trigger, and where the player can avoid it. The back half is in the center, and far out enough for you to push yourself along the wall (there is a small amount of room, so you don't have to be perfectly close to the point where the wall moves out) to skip the trigger. In the example video for Incinerator in a full game run, you can see [[Can't Even]] crouches to ensure he doesn't hit this trigger, this is recommended, although you can still skip the trigger without crouching. | At the entrance to the hallway containing the Portal Gun, there is a trigger that plays dialogue for you finding the Portal Gun. This prevents you from being able to pick up the Portal Gun until the dialogue is finished. This trigger loses a large amount of time, and due to a gap on the side of the trigger, careful movement can avoid the back-half of this trigger, and save a large amount of time, even if done slowly. In the gallery above are two images that show the trigger, and where the player can avoid it. The back half is in the center, and far out enough for you to push yourself along the wall (there is a small amount of room, so you don't have to be perfectly close to the point where the wall moves out) to skip the trigger. In the example video for Incinerator in a full game run, you can see [[Can't Even]] crouches to ensure he doesn't hit this trigger, this is recommended, although you can still skip the trigger without crouching. | ||
| − | Once you're past the trigger, you can go up to the portal gun, and hit your +use key to grab the gun. Once the gun is yours, walk backwards, and shoot a portal on the far wall at the other end of the debris. Moving backwards while shooting this should put you next to the portal surface on your right, where you can place your other portal, and begin a sequence of [[Portal | + | Once you're past the trigger, you can go up to the portal gun, and hit your <code>+use</code> key to grab the gun. Once the gun is yours, walk backwards, and shoot a portal on the far wall at the other end of the debris. Moving backwards while shooting this should put you next to the portal surface on your right, where you can place your other portal, and begin a sequence of [[Portal Stand|portal stands]], similar to those of [[Cube Momentum]] and [[Future Starter]], the main difference being you now control both portals. |
| − | + | ==Portal Stands== | |
| − | + | Once you're standing in the first two portals you placed, took to the end of the hallway of the portal you're coming out of. You want to shoot the portal that you walked through against the far wall, and as you shoot, walk back into the portal your standing on (if you're unfamiliar with Portal Stands, this counters the Speed Portals give you when you shoot while inside of a portal). This shot can be tricky, as the wall you're trying to shoot on is known to spark, or reject a seemingly normal Portal placement attempt. So you might have to try multiple times. Counter-intuitively, shooting closer to the window seems to have better results that shooting farther to the left. | |
| − | + | After you come out of this new portal, you should see another portalable surface down the end of this new corridor. You want to perform another portal stand over there. Coming out of that portal will put you in a small hallway, and you'll see some broken windows up ahead to your left. Moving towards them, and jumping will allow you to see the part of the room leading to the chamber's exit. Portal over there by placing a portal during your jump, and then portaling next to you and passing through. This should leave you by the monitor for the last test chamber in the original Portal game. | |
| − | |||
| − | After you come out of this new portal, you should see another portalable surface down the end of this new corridor. You want to perform another portal stand over there. Coming out of that portal will put you in a small hallway, and you'll see some broken windows up ahead to your left. Moving towards them, and jumping will allow you to see the part of the room leading to the chamber's exit. Portal over there by placing a portal during your jump, and then portaling next to you and passing through. This should leave you by the monitor for the last test chamber in the original Portal game. | ||
The ending changes based on if you're doing a full game run, or a challenge mode run. Both however, involve placing a portal on the top of the wall, in front of the panels, as to jump over them, and avoid the animation of GLaDOS clearing them out. | The ending changes based on if you're doing a full game run, or a challenge mode run. Both however, involve placing a portal on the top of the wall, in front of the panels, as to jump over them, and avoid the animation of GLaDOS clearing them out. | ||
| − | + | =Challenge Mode Specific= | |
| − | + | {{P2_Video|url=https://www.youtube.com/watch?v=DdNgryFfCXc|desc=World Record run by [[Kendal]]}} | |
| − | + | ==Fast Start== | |
| − | <gallery | + | <gallery> |
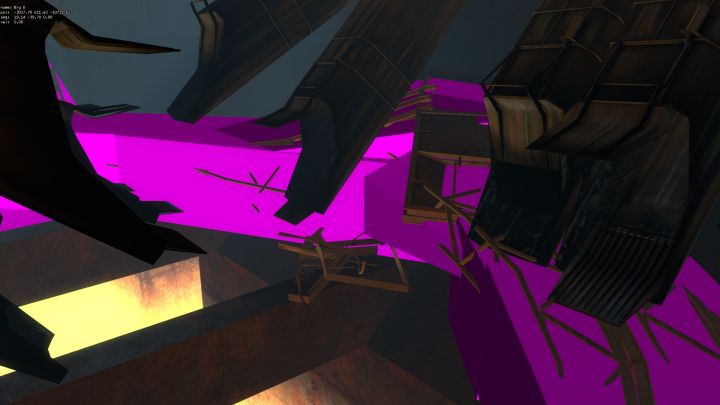
File:IncineratorClipBrushes.jpg|thumb|The clip brushes for the surfaces on Incinerator | File:IncineratorClipBrushes.jpg|thumb|The clip brushes for the surfaces on Incinerator | ||
| − | File:IncineratorClipBrushes2.jpg|thumb|A look at the small protruding clip brush to jump off of | + | File:IncineratorClipBrushes2.jpg|thumb|A look at the small protruding clip brush to jump off of |
</gallery> | </gallery> | ||
| − | + | The faster start for Incinerator is much less consistent, much more difficult (considering the time it takes to retry the skip), and doesn't save too much time. So even though it might be tempting to learn, it's possible to get a good Challenge Mode time on the map without using these jumps. | |
| − | The faster start for Incinerator is much less consistent, difficult (considering the time it takes to retry the skip), and doesn't save too much time. So | ||
There are two ways of doing this jump to skip waiting for the pipes. Both involve a jump off the pipe to your left, in-front of you when you start the level. You want to circle jump onto the pipe, and continuing hopping to end up jumping off the same pipe you would if you were doing the general route. There are two ways to accomplish this. | There are two ways of doing this jump to skip waiting for the pipes. Both involve a jump off the pipe to your left, in-front of you when you start the level. You want to circle jump onto the pipe, and continuing hopping to end up jumping off the same pipe you would if you were doing the general route. There are two ways to accomplish this. | ||
| − | + | For his 2nd place run, [[Zypeh]] does a circle jump off the first pipe in an effort to gain speed, and not necessarily distance. After jumping off the pipe, he aims for the space right in-front of where you would normally walk, and jumps off the far left edge of this surface. From here, the speed he gained from the first jump, and subsequent jumps gets him far enough to land on that pipe that you jump off of after waiting for the pipes to move in the general route. In my personal opinion, this route is a little harder to manage. | |
| − | |||
| − | For his | ||
The second option, is to do a less powerful circle jump onto the first pipe, and land farther down the pipe, with a goal of going farther, instead of faster. This can put you past the pipes, as opposed to before them, and gives you a bit of an easier jump onto the final pipe. Too much speed can ruin this route however, and you'll go too far, and miss the edge of the clip brush. Both of these strategies should be practiced outside of challenge mode, with a convenient save so you can get a feel for the jump without needing to sit through the 20 second cut scene. | The second option, is to do a less powerful circle jump onto the first pipe, and land farther down the pipe, with a goal of going farther, instead of faster. This can put you past the pipes, as opposed to before them, and gives you a bit of an easier jump onto the final pipe. Too much speed can ruin this route however, and you'll go too far, and miss the edge of the clip brush. Both of these strategies should be practiced outside of challenge mode, with a convenient save so you can get a feel for the jump without needing to sit through the 20 second cut scene. | ||
| − | Another minor, but important difference in the Challenge | + | Another minor, but important difference in the Challenge Mode route is that dialogue (except the trigger/dialogue skip to get the portal gun early) does not matter, as you will be hitting the flags, and not waiting for a specific dialogue line in the elevator. That makes your only priority after getting the portal gun getting good portal stands. Once you portal over to where the panels are, shoot above them as quickly as possible, and hop to the flags. |
| + | ==Seamshot== | ||
| + | <pre style="color:red">Include details about seamshot</pre> | ||
| − | + | =Full Game Specific= | |
| − | |||
{{P2_Video|url=https://www.youtube.com/watch?v=BQlv4XjsxBs|time=2683|desc=Incinerator in [[Can't Even]]'s Portal 2 Tutorial Series}} | {{P2_Video|url=https://www.youtube.com/watch?v=BQlv4XjsxBs|time=2683|desc=Incinerator in [[Can't Even]]'s Portal 2 Tutorial Series}} | ||
| + | ==Full Game Dialogue== | ||
Dialogue is important on Incinerator. From when you pickup the Portal Gun, to when you do Portal Stands, to when you activate a trigger at the end, and so on. | Dialogue is important on Incinerator. From when you pickup the Portal Gun, to when you do Portal Stands, to when you activate a trigger at the end, and so on. | ||
| − | You want to pickup the Portal Gun when GLaDOS is saying "''we can | + | You want to pickup the Portal Gun when GLaDOS is saying "''we can '''START''' testing''", and once you go through your first Portal Stand, you should hear GLaDOS transition into another dialogue with "''good, you have a dual portal device, there''". Then, as you finish the rest of the chamber, and approach the end. Once you turn the corner to where the panels are, you want to walk forward, and look above the door at the end. You walk forward to activate the physical trigger, and there is a look trigger around the panels that needs to be looked at by the player. |
| − | There are two outcomes assuming you did the start correctly, the first is that the short dialogue is still going from when you did you first portal stand (this involves amazingly fast portal stands, and will | + | There are two outcomes assuming you did the start correctly, the first is that the short dialogue is still going from when you did you first portal stand (this involves amazingly fast portal stands, and will be nearly impossible if you're still learning the chamber), and in this case, hitting the look trigger will skip the dialogue associated with the look trigger, and just play the ending dialogue. This is the fastest you can get the dialogue for a Full Game run. |
The second, slightly slower but still beneficial ending happens if you hit the look trigger when there is no dialogue playing. This is faster than doing the map with the long dialogue players skip when grabbing the portal gun, but slower than the aforementioned route. GLaDOS does her line about moving the panels, and then starts the ending dialogue. | The second, slightly slower but still beneficial ending happens if you hit the look trigger when there is no dialogue playing. This is faster than doing the map with the long dialogue players skip when grabbing the portal gun, but slower than the aforementioned route. GLaDOS does her line about moving the panels, and then starts the ending dialogue. | ||
| Line 74: | Line 67: | ||
The optimal dialogue for the [[Elevator Fade]] is entering the elevator while GLaDOS says "''for''" | The optimal dialogue for the [[Elevator Fade]] is entering the elevator while GLaDOS says "''for''" | ||
| − | "''But the important thing is you're back. With me. And now I'm onto all your little tricks. So there's nothing to stop us from testing... ''' | + | "''But the important thing is you're back. With me. And now I'm onto all your little tricks. So there's nothing to stop us from testing... '''FOR''' the rest of your life.''" |
| − | |||
[[Category:Maps]] | [[Category:Maps]] | ||
[[Category:Singleplayer Maps]] | [[Category:Singleplayer Maps]] | ||
| + | [[Category:Courtesy Call]] | ||
Latest revision as of 17:11, 27 October 2022
- Previous Map Wakeup
- File Name sp_a2_intro
- Appearance Courtesy Call
- Native to Challenge Mode Yes
- World Record loading...
- Least Portals loading...
- Next Map Laser Intro
Contents
Overview
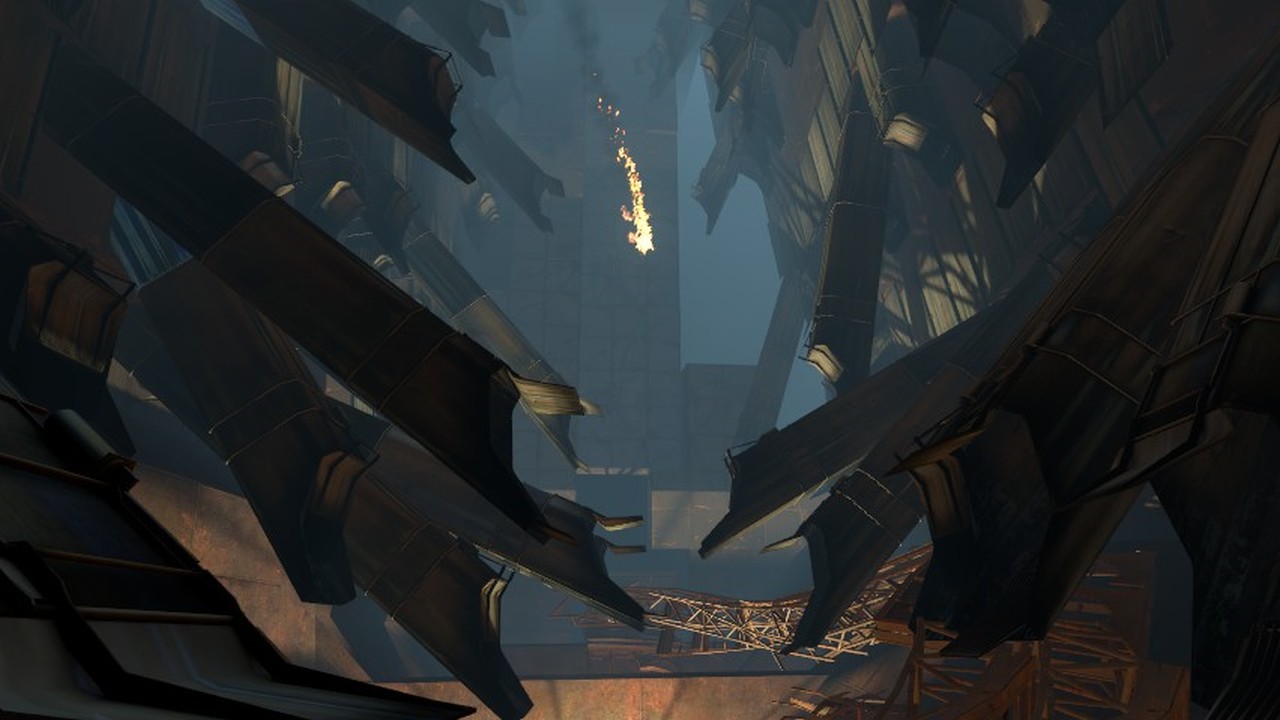
Incinerator has you explore the pit you threw pieces of GLaDOS into during the first game, as well as being the chamber where you get the Dual Portal Gun, and are no longer limited to one portal.
General Route
Example in a Full Game run by Can't Even
Unfortunately, the unskippable 20 second cutscene at the start of the level is present in both Full Game and Challenge Mode. This means that this is a great map to create a save for. Creating a custom save for this map at the end of the cutscene makes practicing this map much easier than just restarting the level any time you need to start over.
Starting Route Variations
After the cutscene, you want to go about skipping some of this first room. There are two main methods for accomplishing this. The faster of the two is much more difficult, and only saves about a second, and that method will be done over in the Challenge Mode Specific section. Even for challenge mode, you can very easily get a top time without the use of the harder route, so we will go over the more standard route here.
Once you gain control of your character, you want to walk to your right, towards the pipes that will move out of your way. Tapping your strafe keys while walking (AD Spamming) is the fastest way to hit the trigger activating the movement of the pipes, if you jump during the start of the map, you will jump over the pipes, and they will not rise as quickly. After the pipes move our of your way, look to your left. There is a large pipe sticking out, and with a Circle Jump, you can hop off it, towards the end of the incinerator room.
Portal Gun Trigger Skip
At the entrance to the hallway containing the Portal Gun, there is a trigger that plays dialogue for you finding the Portal Gun. This prevents you from being able to pick up the Portal Gun until the dialogue is finished. This trigger loses a large amount of time, and due to a gap on the side of the trigger, careful movement can avoid the back-half of this trigger, and save a large amount of time, even if done slowly. In the gallery above are two images that show the trigger, and where the player can avoid it. The back half is in the center, and far out enough for you to push yourself along the wall (there is a small amount of room, so you don't have to be perfectly close to the point where the wall moves out) to skip the trigger. In the example video for Incinerator in a full game run, you can see Can't Even crouches to ensure he doesn't hit this trigger, this is recommended, although you can still skip the trigger without crouching.
Once you're past the trigger, you can go up to the portal gun, and hit your +use key to grab the gun. Once the gun is yours, walk backwards, and shoot a portal on the far wall at the other end of the debris. Moving backwards while shooting this should put you next to the portal surface on your right, where you can place your other portal, and begin a sequence of portal stands, similar to those of Cube Momentum and Future Starter, the main difference being you now control both portals.
Portal Stands
Once you're standing in the first two portals you placed, took to the end of the hallway of the portal you're coming out of. You want to shoot the portal that you walked through against the far wall, and as you shoot, walk back into the portal your standing on (if you're unfamiliar with Portal Stands, this counters the Speed Portals give you when you shoot while inside of a portal). This shot can be tricky, as the wall you're trying to shoot on is known to spark, or reject a seemingly normal Portal placement attempt. So you might have to try multiple times. Counter-intuitively, shooting closer to the window seems to have better results that shooting farther to the left.
After you come out of this new portal, you should see another portalable surface down the end of this new corridor. You want to perform another portal stand over there. Coming out of that portal will put you in a small hallway, and you'll see some broken windows up ahead to your left. Moving towards them, and jumping will allow you to see the part of the room leading to the chamber's exit. Portal over there by placing a portal during your jump, and then portaling next to you and passing through. This should leave you by the monitor for the last test chamber in the original Portal game.
The ending changes based on if you're doing a full game run, or a challenge mode run. Both however, involve placing a portal on the top of the wall, in front of the panels, as to jump over them, and avoid the animation of GLaDOS clearing them out.
Challenge Mode Specific
World Record run by Kendal
Fast Start
The faster start for Incinerator is much less consistent, much more difficult (considering the time it takes to retry the skip), and doesn't save too much time. So even though it might be tempting to learn, it's possible to get a good Challenge Mode time on the map without using these jumps.
There are two ways of doing this jump to skip waiting for the pipes. Both involve a jump off the pipe to your left, in-front of you when you start the level. You want to circle jump onto the pipe, and continuing hopping to end up jumping off the same pipe you would if you were doing the general route. There are two ways to accomplish this.
For his 2nd place run, Zypeh does a circle jump off the first pipe in an effort to gain speed, and not necessarily distance. After jumping off the pipe, he aims for the space right in-front of where you would normally walk, and jumps off the far left edge of this surface. From here, the speed he gained from the first jump, and subsequent jumps gets him far enough to land on that pipe that you jump off of after waiting for the pipes to move in the general route. In my personal opinion, this route is a little harder to manage.
The second option, is to do a less powerful circle jump onto the first pipe, and land farther down the pipe, with a goal of going farther, instead of faster. This can put you past the pipes, as opposed to before them, and gives you a bit of an easier jump onto the final pipe. Too much speed can ruin this route however, and you'll go too far, and miss the edge of the clip brush. Both of these strategies should be practiced outside of challenge mode, with a convenient save so you can get a feel for the jump without needing to sit through the 20 second cut scene.
Another minor, but important difference in the Challenge Mode route is that dialogue (except the trigger/dialogue skip to get the portal gun early) does not matter, as you will be hitting the flags, and not waiting for a specific dialogue line in the elevator. That makes your only priority after getting the portal gun getting good portal stands. Once you portal over to where the panels are, shoot above them as quickly as possible, and hop to the flags.
Seamshot
Include details about seamshot
Full Game Specific
Incinerator in Can't Even's Portal 2 Tutorial Series
Full Game Dialogue
Dialogue is important on Incinerator. From when you pickup the Portal Gun, to when you do Portal Stands, to when you activate a trigger at the end, and so on.
You want to pickup the Portal Gun when GLaDOS is saying "we can START testing", and once you go through your first Portal Stand, you should hear GLaDOS transition into another dialogue with "good, you have a dual portal device, there". Then, as you finish the rest of the chamber, and approach the end. Once you turn the corner to where the panels are, you want to walk forward, and look above the door at the end. You walk forward to activate the physical trigger, and there is a look trigger around the panels that needs to be looked at by the player.
There are two outcomes assuming you did the start correctly, the first is that the short dialogue is still going from when you did you first portal stand (this involves amazingly fast portal stands, and will be nearly impossible if you're still learning the chamber), and in this case, hitting the look trigger will skip the dialogue associated with the look trigger, and just play the ending dialogue. This is the fastest you can get the dialogue for a Full Game run.
The second, slightly slower but still beneficial ending happens if you hit the look trigger when there is no dialogue playing. This is faster than doing the map with the long dialogue players skip when grabbing the portal gun, but slower than the aforementioned route. GLaDOS does her line about moving the panels, and then starts the ending dialogue.
The optimal dialogue for the Elevator Fade is entering the elevator while GLaDOS says "for"
"But the important thing is you're back. With me. And now I'm onto all your little tricks. So there's nothing to stop us from testing... FOR the rest of your life."
